Pages

Wednesday, November 13, 2013

there's no place like home...

hey guys and gals, sorry for being so MIA lately, I've been so busy baking that I haven't had any time to actually write about my cupcakes. I found a moment of peace so I thought I would share with you the event I catered last weekend for the Center for Spiritual Living in Costa Mesa. The theme of the event was the Wizard of Oz so obviously I was over the moon to create the display using the yellow brick road.

I wanted the display to tell the story of the movie so I created a dazzling yellow brick road display and created a custom menu for the event. Check it out...

Menu:
Dorothy - a vanilla cupcake in a blue checkered liner with a ruby slipper or a poppy for decoration
Scarecrow - a brown sugar cupcake in a brown liner with a burlap bow for decoration
Tin Man - a red velvet cupcake in a silver liner with a red glitter heart for decoration
Lion - a peanut butter cupcake in a gold liner with a gold crown for decoration

Cake - A vanilla and red velvet striped cake to resemble the Wicked Witches tights


thanks for stopping by! XO

Monday, July 29, 2013

DIY: Cupcake Stand To-Go

DIY: Cupcake Stand To-Go

I love family birthdays, it gives me an excuse to create a fun cupcake display for the birthday boy or girl. When I set out to create my display I knew I needed one that could withstand a 5 hour drive and hold 60 cupcakes. Of course they were all way over priced.  I remembered a few years back my Cousin had shown me a trick she uses to create her multi tiered fruit displays for family 
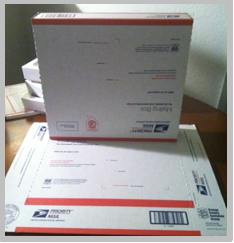
parties. Her secret, USPS boxes, she keeps any boxes that are shipped to her house in anticipation of a repurposing project. Directions and pictures below...

Total Cost: $4

Supplies you’ll need to create your Cupcake Stand To-Go:
3 medium flat rate USPS boxes (I  keep any boxes that I receive in the mail)
Tape (I used clear masking tape)
Paint (I used acrylic paint from Michaels, $2.50 with my 40% off coupon)
Paint brush (any kind)
Scissors

Box #1 – Base
Box #2 – Top Tier
Box #3 – Middle and Bottom Tier

Step #1 – Place Box #1 flat down for your base
Step #2 – Build Box #2 and place ¾ of the way back on Box #1, place a small piece of tape, enough to hold the box down
Step #3 – While laying flat, measure Box #3 8 inches, the bottom half will be 4 inches; these are Tiers 2 & 3. Cut the box where you measured to make two half boxes.
Step #4 – Build the half boxes to make Tiers 2 & 3
Step #5 – Place the 8 inch Tier in front of the tallest Tier and tape enough to hold it in place.
Step #6 – Place the 4 inch Tier in front of the tallest Tier and tape enough to hold it in place.
Step #7 – Paint the stand (I painted 4 coats to be sure the tape was covered) and you’re ready to create your display!

Sunday, January 13, 2013

reduce. reuse. recycle what you already have!

some may consider me a "hoarder". let me be more specific, my mother would consider me a hoarder. i'm not saying i completely disagree, i'm just saying there's a method to my madness. i like to "hoard" certain things that can benefit me in the future, such as, ribbon, gift bags, purses, shoes, scrapbook paper and designer magazines. i'm always trying to find cheap ways to decorate our house so i like to have supplies handy in case i randomly come up with an idea or if i see something on pinterest. and lets be clear, it's not out of control...

the past year i have developed a new obsession, designer bags, and by "bags" i don't mean the one's we wear; i mean the ones the bags we buy come in and their boxes. i saw this picture of a woman who framed and hung designer bags in her office and i thought to myself, maybe one day i'll have entire wall like her, until then my extra large tiffany bag that i framed for the bathroom will have to suffice. just because i can't shop like carrie bradshaw doesn't mean i can't decorate like carrie bradshaw.

this weekend i decided my ribbon collection needed some organizing and i remembered i got the most amazing victoria's secret boxes with one of my christmas presents this year so i got to work. then one thing led to another and well, you'll see below...


doesn't it look fabulous like this?


i was so excited when they fit perfectly. i have another box
on the counter that has playing cards instead of business cards.

what kind of "supplies" do you like to "hoard" ;-)